
A short battery problem can turn into a huge recall. In 2025, U.S. product recalls hit a record high, with millions of defective units pulled because of things like overheating risks, missing allergen labels, and safety rule breaks. If you run a product team, this is more than bad press. Strong product quality procedures protect people, build trust, and keep costs under control.
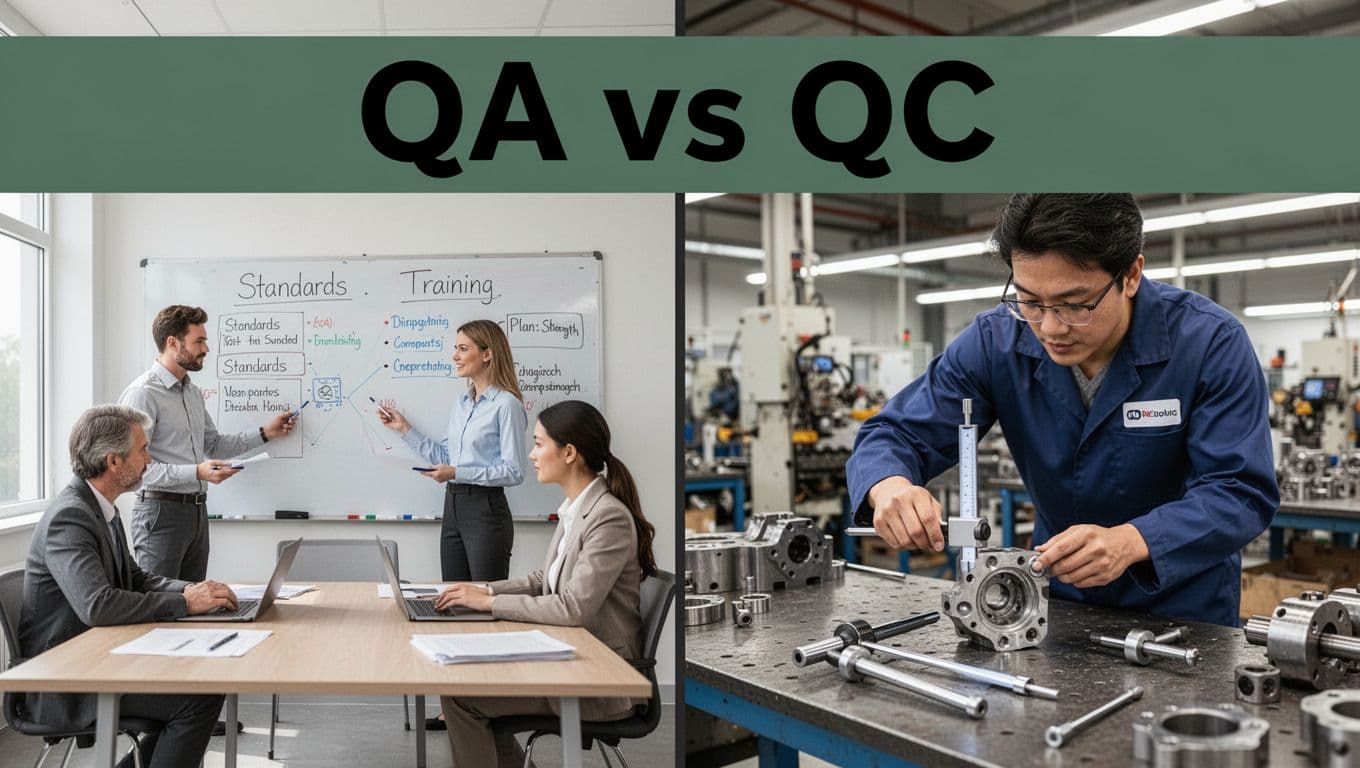
Quality assurance (QA) focuses on preventing problems before they happen, through the right systems, training, and checks. Quality control (QC) catches issues during production or after tests, so you can stop bad units early. When QA and QC work together, you reduce repeat defects and avoid costly rework, refunds, and returns.
In practice, you need standard steps that cover everything from requirements and supplier checks to testing, inspection, documentation, and audits. You also need to align with common standards and tools, then update your process as risks shift. Next, you’ll see how QA and QC differ, which procedures matter most, and what to expect from 2026 quality trends as teams start using more automation and risk-based testing.
Why Knowing Quality Assurance and Quality Control Makes All the Difference
If you only react after defects show up, you’ll always feel behind. QA and QC change that. They work like a seatbelt system: QA helps you avoid crashes in the first place, while QC helps you spot damage early when something still slips through.
In U.S. recall data from 2025, the number of broken units jumped sharply, which is a warning sign for manufacturers. When problems reach consumers, the cost is not just money. It also includes trust, delays, and extra work to fix what should have been prevented earlier. That’s why understanding QA vs QC matters before you change a single process step.
Here’s the clean difference, plus real examples you can picture on your production floor.
| Area | QA (Quality Assurance) | QC (Quality Control) |
|---|---|---|
| Focus | Prevent defects (process) | Detect defects (product) |
| Timing | Before and during production | During key steps and after testing |
| Typical work | Training, standards, supplier audits | Inspections, measurements, lab tests |
| Goal | Build quality in early | Catch bad units before shipment |
So how does it show up in daily operations? QA looks like making sure the right steps exist and people follow them. QC looks like checking the results, then rejecting anything that fails. For a clear government-side definition, see QA and QC explanations from the EPA. The core idea stays the same: QA prevents, QC detects.
When QA Happens in the Process
QA starts long before the first unit runs. First, you set standards: what “good” looks like, which specs matter, and what risks you must prevent. Next, you train people so the standard is clear, not vague. After that, QA turns outward through supplier audits, incoming checks, and approved materials lists. When you control inputs, you reduce chaos later.
During production, QA keeps watching the system, not just the part. For example, it can include process walkthroughs, calibration planning, and controlled change reviews. If someone proposes a tweak, QA checks whether it affects critical steps or materials. In other words, QA behaves like a traffic light system, so the factory flows correctly instead of relying on luck.
Also, QA should not sit in a binder. It needs feedback loops. When QC finds a pattern, QA updates training or procedures so the same defect stops repeating. In quality terms, that cycle is how you keep defects from becoming normal.
If you want a plain view of the same logic, the U.S. Geological Survey describes QA as prevention and QC as detection in practice, which matches what you do in manufacturing. You can see the framing at Manage Quality from the USGS.
QC’s Role in Spotting Problems
QC takes over at the checkpoints where defects can be measured. That means inspections after key steps, not just an end-of-line sweep. For example, if your product depends on size, QC measures critical dimensions. If strength matters, QC runs tests. If purity matters, QC validates ingredients and contaminants with lab checks.
Then comes the part many teams struggle with: rejecting bad items confidently. QC shouldn’t negotiate with failure. When a unit falls outside limits, the process must remove it, quarantine it, and document why. That documentation helps the next QA update too.
In practical terms, QC reduces “hidden defects” that only appear after shipping. It also protects your throughput, because you catch problems earlier, before rework spreads across batches. When QC catches issues reliably, you spend less time chasing returns and more time producing good units on schedule.
QA builds the rules and conditions. QC confirms the results. Together, they stop the same bad outcome from repeating.
The Main Steps Every Quality Procedure Follows
Good quality procedures do not feel random. They act like a well-built map, so your team knows where to look, what to check, and what to do next. When you follow the same steps every time, you reduce defects because you catch risks early, not after customers complain.
A quality system also works best when QA and QC are connected. QA sets up the rules. QC checks the results. Then the whole loop tightens through fixes and trend reviews.
Here are the six core steps that quality procedures usually follow, written like a practical guide you can run on a shop floor.
1) Plan quality first: set standards, risks, and measurable goals
Start by defining what “good” means. That means specs, acceptance limits, and clear sampling rules. Next, identify risks that can break those specs.
For example, if you make a bottled drink, risks include wrong mix ratios, poor seal integrity, and temperature swings during filling. If you make electronics, risks can include solder defects, moisture exposure, and calibration drift.
To make planning work, set measurable goals, not fuzzy targets. Examples include “reduce seal failures by 30%” or “cut out-of-spec thickness to under 0.5%.”
Quick tips:
- Write standards in plain language so workers use them without guessing.
- Include risk ranking, so you focus on the few variables that matter most.
- Tie goals to real outcomes, like rework rate, scrap rate, or customer returns.
2) Vet your suppliers before they deliver
If you feed your process unreliable inputs, you will chase problems forever. So, you qualify suppliers based on risk, not just price.
Start with audits, then confirm performance through incoming checks and testing. High-risk materials get tighter controls. Low-risk materials may only need documentation review.
For example, a food producer might require allergen handling validation from suppliers. A medical device maker must be strict about traceability and documented controls. In 2026, FDA’s QMSR for medical devices fully takes effect on February 2, 2026, bringing a stronger risk-based system and clearer access to supplier and risk documentation. You can review QMSR FAQs from the FDA here: FDA QMSR frequently asked questions.
Quick tips:
- Use risk tiers for suppliers (high, medium, low) and set controls per tier.
- Require certificate of analysis or test reports when it fits the risk.
- Watch trends, not one-off pass or fail decisions.
3) Monitor production in real time
Next, control the process while it runs. Real-time monitoring prevents small issues from growing into whole-batch defects.
Think of it like driving with a dashboard. You still check the road, but gauges tell you when something changes. In manufacturing, “gauges” look like time stamps, batch records, process parameters, and in-line measurements.
Examples:
- During assembly, track torque, RPM, and cycle counts per station.
- During mixing, monitor batch temperatures, hold times, and component order.
- During packaging, monitor fill weight and seal temperature.
Quick tips:
- Link monitoring points to critical-to-quality steps, not every step.
- Use alerts with clear actions, so teams know what to do immediately.
- Calibrate instruments on schedule, then verify performance after maintenance.
4) Test every product thoroughly
Even with strong controls, you still need evidence that each product meets specs. QC testing turns “we think it’s fine” into “we can prove it’s fine.”
Testing depends on your product, so use a mix of:
- Visual inspection for workmanship and defects you can see
- Dimensional checks for critical geometry
- Lab tests for purity, strength, stability, or contamination risks
- Functional tests for performance under real use conditions
After testing, review results with the same discipline. If results cluster near a limit, treat it as a warning sign. That pattern often shows drift, not a one-time mistake.
Quick tips:
- Define sampling plans based on risk and process capability.
- Record results so you can trace back to materials, operators, and equipment.
- Set rules for what triggers investigation (example: repeated borderline results).
5) Fix problems and prevent repeats with CAPA
When defects happen, you need a path that goes beyond fixing the unit. That path is CAPA, corrective and preventive actions.
Corrective actions solve the current issue. Preventive actions stop future repeats by addressing the root cause and system gaps. If you only correct the symptoms, the same failure returns later, usually in a new batch.
A strong CAPA starts with investigation. Then it identifies the root cause. After that, you plan actions, assign owners, set due dates, and verify effectiveness.
In pharma and other regulated industries, CAPA expectations are well described in FDA materials like CAPA within the Pharmaceutical Quality System. Even if you are not in pharma, the logic still applies: root cause first, then verified prevention.
Quick tips:
- Write the problem statement with dates, batch IDs, and defect counts.
- Use data to find the real cause, not the first likely cause.
- After actions, prove they worked with new evidence.
6) Track trends for ongoing improvement
Finally, you need a feedback loop. Trend tracking shows where quality drifts over time, before it turns into major failure.
Good trend reviews connect:
- Rework and scrap rates
- Incoming material failure rates
- Test result distributions (not just pass/fail)
- CAPA closure performance (did it truly stick?)
- Supplier performance over time
A simple monthly review can catch patterns early. For example, if gasket failures rise after a supplier lot change, you can act before you ship more affected units.
Quick tips:
- Review trends by product line, supplier, and equipment station.
- Watch leading indicators, like borderline test results and increases in investigations.
- Feed trend results back into planning, supplier controls, and training.
Bottom line: quality procedures work when they follow the same loop, plan to prevent, test to confirm, and CAPA to prevent repeats.
Top Standards That Guide Product Quality Worldwide
If you want consistent product quality worldwide, you need more than good intentions. You need well-known standards that tell you what to build, what to track, and how to improve. Think of these standards like shared road rules, so teams across countries can still drive the same direction.
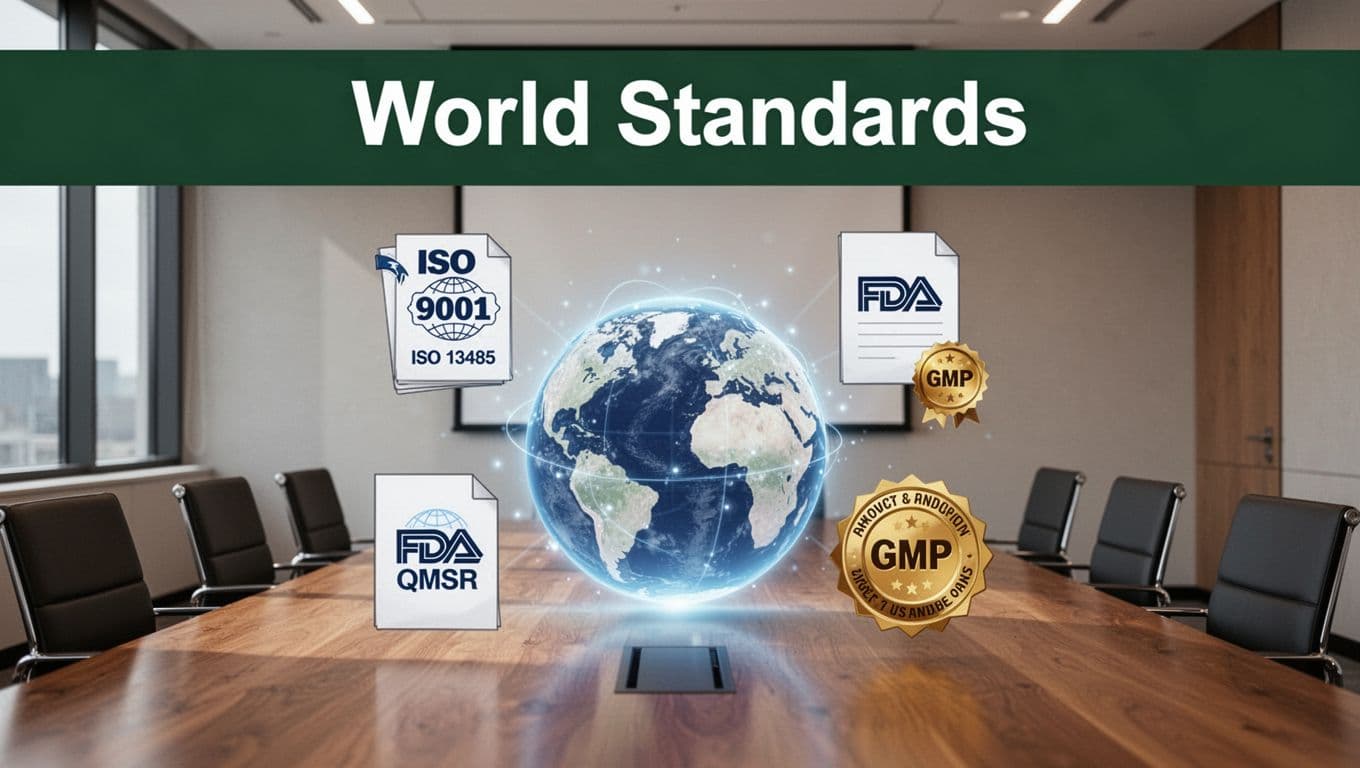
Most companies build a “stack” of standards. ISO gives the management system backbone. Regulated industries add tighter rules for patient safety, drug purity, and sterility.
ISO 9001: The Foundation for Any Business
ISO 9001 focuses on a practical quality management system. It pushes customer focus, clear processes, and continual improvement. In other words, you do not just check products, you manage how your whole organization delivers value.
To make it work, ISO 9001 typically drives you to:
- Define roles and responsibilities so nobody guesses
- Measure performance with targets and trends
- Handle nonconformities and take corrective action
- Control documents, because “version chaos” creates defects
Many teams also use ISO 9001 certification to reduce sales friction. Customers and partners often expect proof that your system stays under control, not only during audits. If you want the official baseline, start with ISO 9001:2015 requirements.
ISO 13485 and FDA’s 2026 QMSR Shift
Medical devices need lifecycle thinking, not just a good production day. ISO 13485:2016 is built for that reality. It emphasizes risk management, design and development controls, traceability, and checks that span from planning through after-sale service.
Then the U.S. added a major change. The FDA’s Quality Management System Regulation (QMSR) went into effect on February 2, 2026. It replaces the old QSR (21 CFR Part 820) and aligns closely with ISO 13485:2016 language and structure. As of late March 2026, it is fully implemented, so teams need their system ready now.
In plain terms, QMSR keeps the same goal: fewer defects, safer devices. However, it tightens expectations around risk-based decisions and how you show those decisions in your records.
For pharma, the matching standard is different. GMP expects daily discipline, controlled environments, and validated processes. Sterility controls, cleanroom behavior, and batch release evidence matter because patients cannot wait for “later fixes.”
Smart Tools and Tech for Easier Quality Checks
Smart quality tools help you catch defects earlier, with less guesswork. Think of them like extra headlights on a dark road. You still drive, but you see more, sooner, and you react faster when something looks off.
The best part? These tools reduce back-and-forth. Instead of debating whether a result “seems wrong,” you rely on repeatable measurements, clear records, and real-time signals.
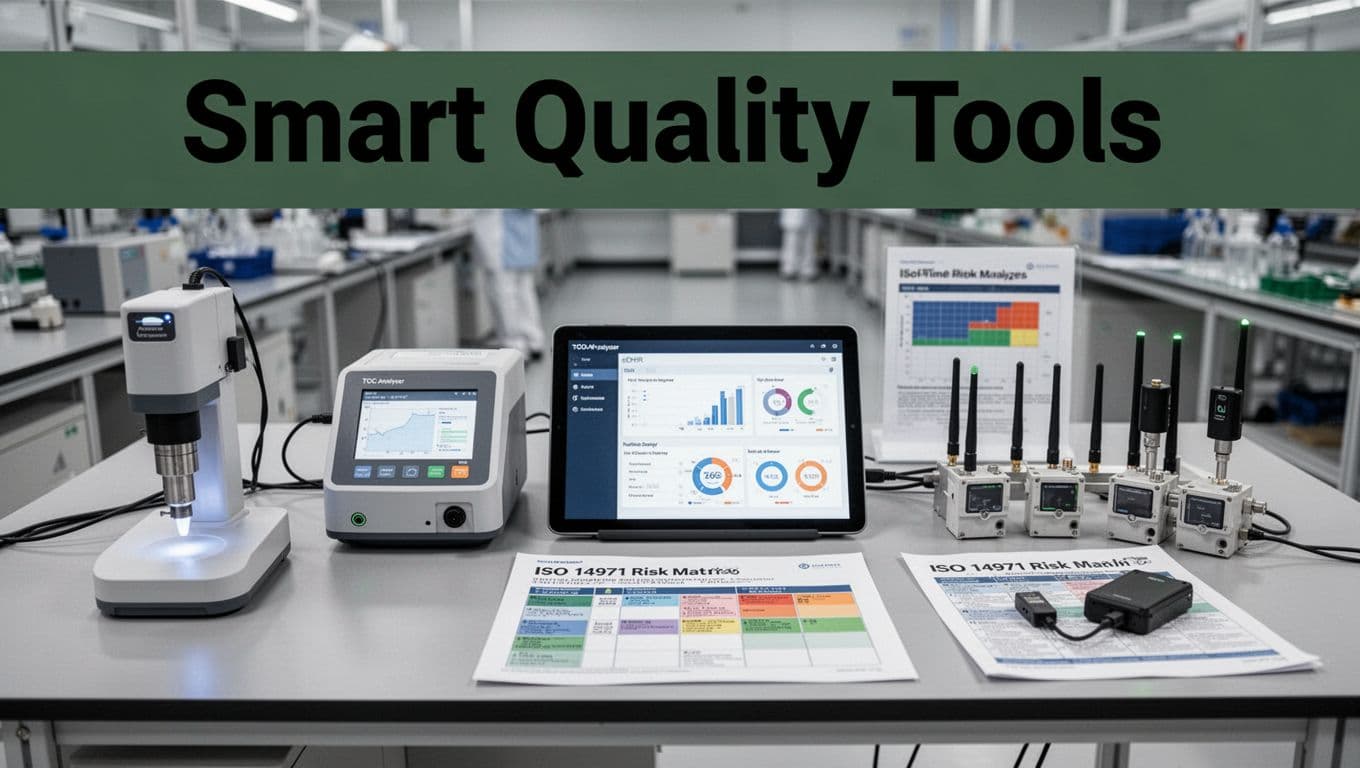
Risk-first toolkits (ISO 14971) that tell you what to check
Tools work best when you aim them at the right risks. That’s where ISO 14971 fits in, especially for teams in regulated medical devices. It gives you a repeatable way to identify hazards, estimate risk, and decide which controls you need.
In day-to-day quality checks, this changes the question from “What can we measure?” to “What could hurt someone, and what evidence proves we controlled it?”
A practical way to use the risk toolkit is to link each quality check to a risk decision:
- Risk scenario: what could go wrong (for example, a chemical contamination source)
- Control type: what reduces the chance or severity
- Verification method: what test or inspection proves the control worked
- Acceptance rule: what “passes” and what triggers investigation
When you do this, your inspection plan becomes easier to defend. Auditors see that you didn’t pick checks randomly. You tied them to a documented risk logic.
For teams that need an easy-to-follow reference, this guide on risk management under ISO 14971 can help: ISO 14971 risk management guide.
Bottom line: risk tools prevent you from measuring everything, while still catching the things that matter.
Fast, accurate testing gear like NIR and TOC
Now let’s talk instruments. Modern testing tools shorten the time between “something might be wrong” and “we know for sure.”
NIR (near-infrared) spectroscopy is popular because it can measure chemical or physical properties quickly, often without complex sample prep. You can use it for moisture, fat, protein, or ingredient identity checks. In many setups, NIR becomes part of process analytical technology (PAT), so you measure while production runs.
For example, NIR process sensors like BUCHI NIR-Online PA2 support closer monitoring of key parameters during manufacturing.
TOC (total organic carbon) testing helps when contamination control matters. Teams use TOC to track organic residues in water systems and cleaning validation workflows. Faster TOC turnaround means fewer holds and fewer “wait-and-see” decisions.
If you want an example of a common online approach, see TOC analyzers that report TOC.
Here’s how these tools typically save time and improve accuracy:
- Less manual handling reduces mix-ups and operator variation
- Shorter cycle time speeds up release decisions
- Consistent measurement improves data comparability across shifts
- Better visibility helps you catch drift before it becomes a batch failure
Quick pros and cons to consider:
Pros
- Faster feedback during production
- Repeatable measurements with clear numeric outputs
- Strong support for real-time quality checkpoints
Cons
- You still need good calibration and qualification
- Models can drift if processes change
- Not every product can be measured with NIR or TOC
eDHR software and audit trails that make inspections simpler
Testing is only half the job. The other half is the paperwork that proves you did it right.
eDHR (electronic device history record) software helps teams store, control, and retrieve quality data. It also helps link the dots between what happened on the floor and what sits in your quality system records.
When eDHR is set up well, inspectors spend less time asking for missing details. Instead, they find traceable data, such as:
- who ran the test
- which batch or lot they tested
- what equipment and calibration state they used
- what the result was, and what decision followed
Meanwhile, audit trails matter because they show changes over time. You want proof that records stayed intact, and you want to know who made edits and when. That reduces the risk of unclear versions and weak documentation.
Real-time quality systems also strengthen audit trails. Many smart platforms create an electronic record at the moment data arrives. For instance, if a sensor flags a condition, the system can tie that alert to the batch record immediately.
For teams building risk-based documentation, this also supports ISO-aligned thinking. If you connect each measurement to your risk decision, your records become easier to interpret.
Real-time sensors and inspection tech that catch drift early
Finally, you need tech that doesn’t wait until the end. Real-time sensors help you spot drift while it’s still small.
In most plants, drift shows up first in process parameters. Temperature, pressure, flow rate, vibration, and timing can all shift slowly. Then product quality follows. If you detect the shift early, you can correct conditions before you produce a whole run of rejects.
That’s why factories increasingly use:
- Wireless or hardwired sensors for live process readings
- Dashboards for supervisors and QA to monitor key metrics
- Alerts tied to clear actions (not vague guidance)
- Machine maintenance signals to prevent repeat failures
This approach can improve First Pass Yield because you reduce the number of units that require rework. Also, you cut down on the “mystery defect” problem. Instead of guessing when quality slipped, you have timestamps and operating context.
If you want a credible snapshot of current smart quality trends, use this real-time roundup as a reference point: smart quality tools and real-time sensors.
Remember this: the best inspection plan catches drift, not just final failure.
Step-by-Step Guide to Implementing Quality Procedures
If you want fewer defects, start with a plan you can repeat. Quality procedures should feel like a checklist you trust, not a paperwork puzzle. Use the steps below to bring QA and QC into one working routine.
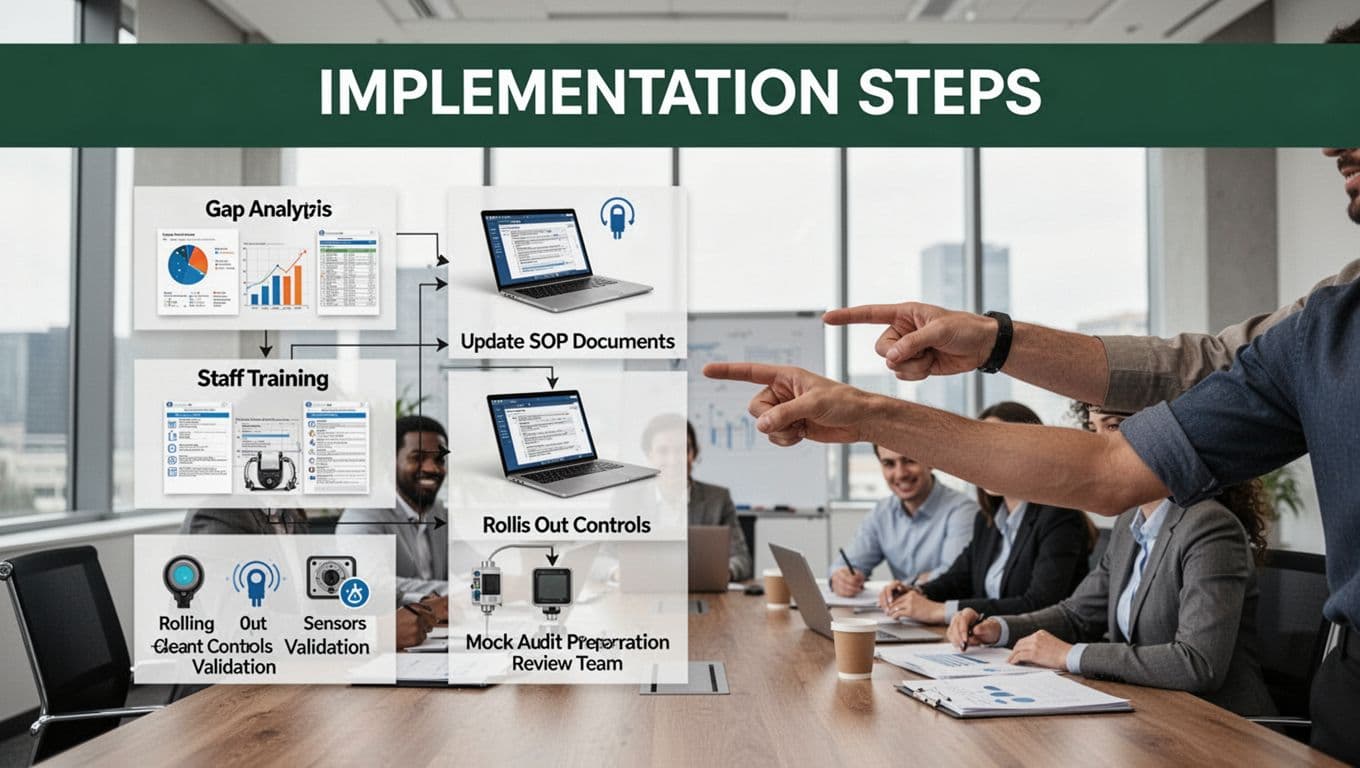
1) Run a gap analysis (4-6 weeks)
Start by comparing your current process to what you actually need. Review your SOPs, test methods, records, and change control. Then map them to your product risks (top failure modes, safety risks, and compliance gaps).
For medical devices, the FDA QMSR shift makes this step even more important. If you’re unsure where to start, use a practical reference like FDA QMSR implementation guidance to organize your review.
2) Update documents and SOPs (6-12 weeks)
Next, rewrite procedures so they match real work. Don’t just polish old language. Add clear acceptance criteria, sampling rules, and escalation paths.
Also, remove steps that don’t support quality. Every extra step adds error chances and slows operators down.
Focus on:
- Work instructions for critical tasks
- Controlled forms (batch records, inspection sheets)
- Change control steps for revisions and approvals
3) Train staff so they can execute (overlapping schedule)
Training should teach the “why” and the “how.” After that, prove understanding with hands-on practice.
Use short sessions by role, because each role touches different risk points. Then test with practical scenarios, not slide decks.
A good training win looks like this: people can follow the procedure without guessing.
4) Roll out controls and validations
Now turn the procedures into actual controls. Start with the highest risk products, sites, and suppliers first. Then validate what you claim.
This rollout should include:
- Equipment calibration and verification
- In-process checks and hold rules
- Supplier incoming controls
- CAPA links for repeat issues
5) Get audit-ready with mock audits
Finally, run mock audits like dress rehearsals. Audit records, interviews, and batch traceability. Then fix issues before the real audit arrives.
Bottom line: compliance culture forms when leadership supports the process, and when teams see quality steps reduce rework.
For small businesses, keep it lean: one owner accountable, one risk register, and one weekly review rhythm. Still, don’t skip the basics. Procedures only work when people believe they matter and can follow them every day.
Tackling the Biggest Challenges in Quality Management
Quality management has a habit of turning into five fires at once. One fire comes from unclear specs, another from suppliers, and a third from records that do not match what happened on the floor. Add in data integrity concerns and the 2026 transitions, and suddenly QA and QC feel like firefighting instead of control.
The good news, though, is that these challenges share the same cure: clear ownership, strong risk docs, and evidence you can explain quickly. When your system can “tell the story,” regulators and customers stop guessing.
Risk documents that stay accurate (not just “audit-ready”)
Risk documentation fails when it becomes a one-time project. You do the risk file during setup, then real changes happen later. Equipment shifts. Suppliers swap lots. Workarounds creep in. If your risk docs do not update, they lose meaning.
Start with a simple rule: risk docs must match current operations. That means you review risk controls when you change materials, processes, test methods, or software. It also means you link each risk control to a verification activity (test, inspection, monitoring, or review). Otherwise, you end up with pages of risk language and no proof.
Here’s a practical way to structure it:
- Risk scenario in plain language
- Controls that prevent or reduce harm
- Verification method that checks control effectiveness
- Acceptance rule that defines pass, fail, and investigation triggers
This approach also supports 2026 changes in medical devices. The FDA’s QMSR emphasizes risk-based choices across your quality system, not only in one design section. Your records should show that logic clearly, especially during inspections after the switch.
Supplier tracking that actually prevents bad inputs
Supplier problems rarely start with one “bad supplier.” More often, they start with weak traceability. You can’t connect a complaint to a lot, and you can’t prove which controls failed.
Treat suppliers like part of your process, not an external vendor. Map every critical input to:
- its spec
- its risk tier
- its receiving checks
- and its traceability path
Then, tighten your tracking for the highest risk inputs. Use lot-level records and keep supplier change notices tied to internal batch records. If your ERP or quality system supports it, automate lot linking so humans do not retype IDs under pressure.
For teams under FDA scrutiny, supplier control shows up in warning letter themes too. One common pattern is that corrective actions never reach the root cause, and supplier-related gaps keep repeating. For a data point on warning letter trends tied to quality system failures, see FDA warning letters and audit trail readiness.
Bottom line: if you can’t trace inputs, you can’t prove control.
Data integrity and audit trails (the records must behave)
Data integrity breaks quietly. Someone “fixes” a value later. A spreadsheet overwrites history. Two versions of a report exist. Even if the final result is right, unclear records can still trigger major findings.
You want audit trails that match reality. That means:
- using controlled templates for forms and batch records
- restricting edits to approved roles
- keeping timestamps for key changes
- and protecting raw data from silent overwrites
Also, link records to decisions. If QC quarantines product, your documentation should show the reason, the evidence, and the next action. If you update a test method, your files should show when, why, and what changed in acceptance rules.
When you do this well, audits become less stressful. When you do it poorly, investigators assume you hid the truth.
2026 transitions, revalidation, and “what changes trigger action”
In 2026, the biggest risk is assuming nothing changes. For medical devices, the FDA’s Quality Management System Regulation (QMSR) took effect on February 2, 2026, replacing the old QSR. In practice, this means your system needs consistent risk-based documentation and supplier controls in line with ISO-style thinking.
Revalidation planning is where many teams slip. They fix the immediate problem, then forget to re-check the process after changes. Instead, build a clear rule for revalidation triggers, such as:
- equipment replacement or major repair
- process parameter changes
- software updates that affect data capture
- supplier or material changes
- updated test methods or calibration approaches
Then, schedule periodic reviews so you revalidate before drift becomes a product failure. Also, run “mock reality” audits. Pull one recent batch and test your traceability from raw data to release decision. If the chain breaks, you fix it now, not later.
Fresh Trends Shaping Product Quality in 2026
In 2026, product quality looks less like guesswork and more like a controlled signal. Teams use risk logic to focus attention, then confirm results faster with real-time testing. After that, they watch performance over the full product life, not just the factory run.
Risk-based approaches move from paperwork to decisions
Risk-based quality is no longer a “nice-to-have.” In 2026, it becomes a daily decision rule. You rank issues by harm, then you design QA and QC actions around the highest risks first. That changes everything, because you stop treating all tests like they have the same value.
Start by defining a simple chain:
- Risk scenario (what could fail)
- Critical controls (what prevents or reduces harm)
- Verification (how you prove the control works)
- Acceptance rules (what “good” and “not good” mean)
From there, you connect risk records to actual work. When a supplier lot changes, you check whether it impacts the risk controls. When equipment maintenance changes a process parameter, you verify the control still holds.
This is also why your supplier checks matter more than ever. Tight incoming controls help, but risk-based plans also tell you where to add deeper scrutiny. For teams with many suppliers, this is how you avoid boiling the ocean.
Bottom line: risk-based quality is not a binder exercise. It guides where you spend time, money, and test capacity.
If you want an example of how risk-based thinking shows up at the regulatory level for medical devices, the FDA discusses risk-based inspections under QMSR in its town hall materials (see FDA QMSR risk-based inspections town hall).
Real-time release testing (RTRT) tightens speed without loosening standards
Real-time release testing (RTRT) changes the timeline for quality proof. Instead of waiting for slow end tests, you release using live data collected during manufacturing, while still meeting predefined quality criteria.
For pharma teams, RTRT is often discussed alongside ASTM E2656, which supports the idea that the process itself can provide strong evidence. It also pushes you toward better sensor coverage, stronger methods, and tighter data traceability.
A practical way to adopt RTRT thinking, even if you do not fully implement it yet, is to ask one question: “Which end-test results can we replace with validated in-process evidence?” Then you build those evidence paths into your procedures.
Common starting points include:
- Process parameters that correlate with key quality attributes
- Inline or at-line tests with fast turnaround
- Statistical models tied to historical performance
If you want a grounded overview of how RTRT works in practice, see Real-Time Release Testing and its role in manufacturing.
AI predictions and lifecycle surveillance strengthen quality after shipping
AI in QA and QC does not mean “set it and forget it.” In 2026, AI helps you predict issues earlier, so you can act before defects spread.
Most teams use AI for three quality tasks:
- Predictive maintenance, so equipment drift does not silently damage output
- Pattern detection, so quality problems show up before they hit acceptance limits
- Decision support, so operators know what action to take when signals shift
Then lifecycle surveillance takes those signals and extends them beyond the factory. Instead of only watching production data, you also monitor performance in use, complaints, service outcomes, and field returns. Sensors and AI can connect those dots, so trends do not surprise you later.
This is also a competitive edge. When you can explain why quality stays stable across time, you protect margins. You also reduce the stress of reactive rework and emergency investigations.
Getting inspection-ready with FDA Program 7382.850
For medical device teams, 2026 brings a sharper inspection focus under the FDA’s Compliance Program 7382.850. The emphasis is risk-based and process-focused, which means your quality system must show control end to end, not just at final checks.
In practice, inspections often test whether your records prove:
- Your risk decisions match reality
- Supplier controls support product safety
- Manufacturing actions connect to data and release decisions
- Postmarket obligations link back into your quality improvements
If you want a clear starting point for how investigators evaluate under this compliance program, use FDA QMSR inspection model and Program 7382.850.
For your internal preparation, do not stop at mock audits. Instead, trace one recent outcome from raw data to decision to corrective action. If that story breaks, fix it now, because inspections will test that link.
Conclusion
Quality procedures work best when they form one clear loop. Plan to prevent defects, test to confirm results, and then use CAPA to stop the same failure from coming back. When QA and QC stay tied together, you cut rework, protect safety, and keep customers confident.
The strongest next step is to audit your current system now. Check whether your QA risk thinking matches your real production decisions, and whether your QC checkpoints truly block out-of-spec product. With the FDA’s QMSR starting February 2, 2026, medical device teams should also verify their records and traceability line up with the new inspection focus (Compliance Program 7382.850).
If you want better outcomes, start with one practical move today: pick one recent batch, then trace raw data to the final release decision. When that story is easy to explain, your process is doing its job.
What part of your quality system needs the most attention right now, supplier controls, testing, or CAPA follow-through?
Share your experience in the comments, and subscribe for more QA and QC tips. If you’d like, download a QA checklist (and use it this week) to spot gaps before they turn into bigger problems.